Timestamps:
0:48 – Copy Video and Subtitles
2:03 – New Support Life-Ring Options
3:00 – Add Shapes
3:38 – Better Gallery Interface
4:23 – Canvas Background
5:00 – Video Positioning
5:34 – Snap Element Option and Hide Canvas Option
7:00 – Rotation
7:20 – Redo Clipscribe Preview Image
9:03 – Capture Frame
9:29 – More Shadow Options
9:40 – Line Height Options
10:14 – Box Padding Options
10:37 – Better Blog Management
11:51 – Master Cloned Subtitles
13:07 – Remove Backgrounds from Frame Grabs
14:18 – Still Image and Thumb Creation
Transcript:
Hey, everybody, it’s Craig. In this video, we’re going to be going over a number of the new features that have been added to Clipscribe recently. So we have a whole lot of new features actually that I guess kind of just quietly rolled out and so in this video, I’m not going to be going into detail about all these features are just going to give you a basic intro into what each of these features does and then in following videos, I’ll be going into the features in more detail.
So we have quite a few to talk about. Let’s just jump right into them here.
Copy your video and subtitles
The first one is the ability to copy your video and subtitles and you see this icon right here. 
Let me go back here, right here. You’ll see that on your my videos page up in the upper right of the thumbnail, and what this is going to do is it’s going to make a copy of your video and your subtitles. Now the funny thing is, I actually added a feature since I added this, that’s a better use of it, that I’ll explain in a minute, but that’s if you want to keep two videos separate, you want to keep your subtitles completely separate so that if you make edits on one, it doesn’t affect the other. If you’re not aware of that, that’s how your videos work. If you create several layouts of the same video, they all share a master set of subtitles unless you use this other new feature I’m going to be telling you about. This is a way to keep them completely separate from each other. Make edits and it won’t affect the other video.
Life Ring Icon
All right next up here, we’ve got a couple of these new support options and you’ll see these little life ring icons here. 
You’ll see it both here on my uploads page, you’ll also see it on the editor page. You’ll see it up by the save and make button and it’s just an easy way for you to get support on the specific video. A window pops up, asks you a few questions and it’s just an easy way without having to go to the help desk and type in everything. It gets me the information that I need really quickly too because it provides me a lot more detail. If you have a problem with the video getting made or video getting transcribed, I would recommend just clicking on that life ring icon because it’s going to help me, help you, basically.
Add Shapes
So, another feature that has been out being the ability to add shapes.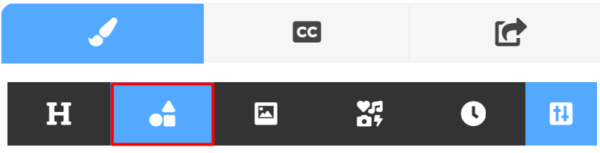
Now, we just have a couple of shapes here to start out, we got the square and the circle. Nothing too crazy has plans for adding more types of shapes, but already these are becoming helpful in a number of different ways. Just know that you can now add these shapes and you can add color to them. You do all the other things that you could add to a logo or an image or the bars that you’ve got on your video.
Better Gallery Interface
Another thing that we’ve got here is I have added a better gallery interface, something that you may or may not noticed but have just made the galleries work better, made them faster. and you’ll see more options as you can now edit like stock backgrounds or images. There’s an image editor now that you can use if you want to crop your image. You’ll see that in there as well. I’ll go over that in more detail, but that’s another, one of the new features that we have another one that we’ve got here is the canvas background.
Canvas Background
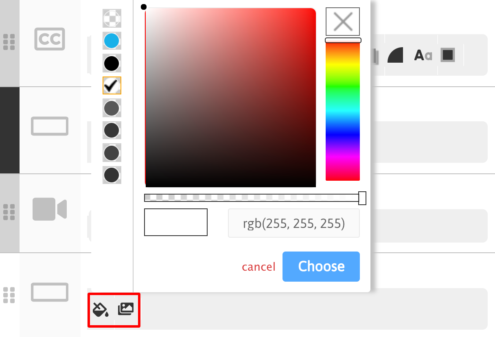
Now the canvas is kind of like the bottom layer behind everything else. Unless you make your bars transparent, you’re really not going to see the canvas anyway, but the canvas is there almost more than anything to help a couple of other features out mainly the zoom feature and also the ability to create still graphics. And so I’ll talk to you about that in a bit, but you will notice that canvas feature on there. It’s just another one that we’ve added here.
Video Positioning
Another one is the video positioning and that’s one of the things that canvas feature was added.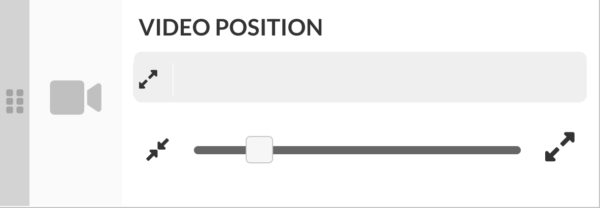
Therefore it’s because now that you can zoom out your video a little bit if you want to have a border around it, you can see right here, there’s a little border around and that’s just because the video zoomed out, you can zoom it in. that’s kind of the first step on this positioning thing because many of you have asked for the ability to position your video up or down and so that’s something that’s going to be coming as well but the zoom option is kind of the first step in that. And again, that’s something that you asked for some of you asked for and so most of these features or stuff that you’ve asked for and that’s why they exist right now.
Snap Element Option and Hide Canvas Option

Another feature is a snap option in the hide canvas options. Now, the funny thing about this is that I’ve actually, I’ve got an update that I’m rolling out on related to this, that makes it a whole lot better because the snap feature has actually had some issues. Maybe you’ve noticed that. So I have a more robust version of this that will be coming in the next few days. It allows you to have a grid on your video and create how many squares you want in the grid and everything and a number of different options to make it easier but you’ll see that these options right here in the upper right of the menu and you click that and these options will show up and click it again and they’ll go away and then the hide elements outside of the canvas. You’re going to probably use that more on the still image, the editor.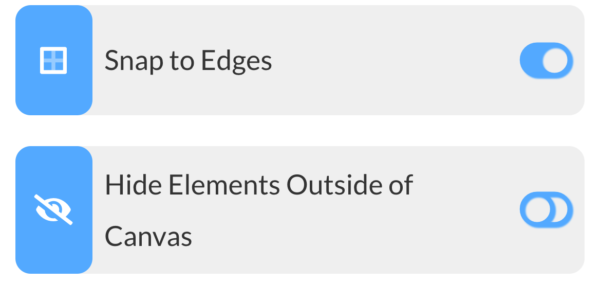
Then I’m going to talk about it in a minute but basically what that’s doing is that when you have images that are kind of hanging outside of the canvas and it gets kind of hard to envision what it’s going to look like the finished product. Then you click that and it hides everything but what is right there in that canvas.
Rotation
Another feature that probably should have added a long time ago, just rotation. So the ability to rotate elements, your subtitles, your image is very simple but very helpful. A couple of cool images or images, a couple of cool features that are related to still images are the ability to frame grab and then use that frame grab so one of the things I call this a vanity feature because a lot of people say how can I change my thumbnail? and they don’t really mean like how can I change my exported thumbnail or they might mean that but when you load up Clipscribe and you load up your editor and it grabs the first frame of your video and you’re just like, you’re just making it’s not pleasant to look at.
Redo Clipscribe Preview Image
And so this is just a vanity feature. If you choose a space on the timeline and you click this reprocess preview thumbnail. It is solely for you to see the thumbnail when it loads up, see something that you would rather see than a frame grab where you’re stuck, and believe me, I’ve had plenty of those. That’s all that does because you can’t embed at least at this point you can’t embed a thumbnail in your video. I think that gets confused a lot of folks want to say, how do I change my thumbnail? Well, you really can’t. Either, if you go to like Facebook or Linkedin, you have to upload a separate thumbnail, there isn’t an embedded one and so when you change that preview image here, you’re just really changing it. It looks more palatable for you to look at but what you can do with one of these new features is you can create your own thumbnails.  One key aspect of that is the ability to do a frame grab or frame capture and so that’s the second option here. You’ll see this little camera icon up in the upper right of the timeline and going to collect that camera icon.
Capture Frame
These options will come up and you’ll actually have a gallery that frame grab will be added into and then you can do a number of things with it. I’ll talk about those in a second.
More Shadow Options
Simple more shadow options are shadow options before we’re pretty limited. Now you have the ability to adjust the shadow distance and the shadow blur. Just some more options here that are for both tech shadows and box shadows.
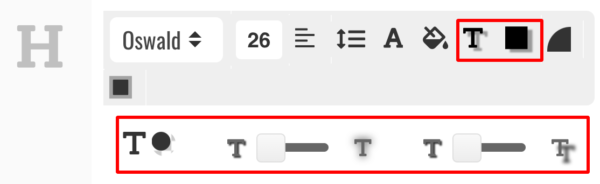
Line Height Options

We’ve got line height options as well, that space in between your lines wasn’t really something that you could mess with before and that’s what this little icon right here is so if you want to adjust the line height and your text, you’re able to do that now. Okay, what else do I got here?
Box Padding Options
Box padding options. This space between the edges of the box and your text. That’s what the padding is. That’s what that spacing is. Obviously, you can just drag the box bigger, but this provides a more precise way of managing that. Let me just go back here. That’s going to be this icon right here, that you will do that box padding with that is some better blog management.
Better Blog Management
What you can do now, as far as managing your blog, you can actually save revisions. If you go in and you make some edits, if you want to save a revision of that in our editor, you can do that. another thing that’s been added that I need to go over in more detail that as you’re editing your subtitles, you’ll see a little paragraph icon, and using that paragraph icon you can actually put in headlines and line paragraph breaks as you’re editing your subtitles and so as you put in a headline, so you want a headline here and you’re thinking this is how I want my exported text to look like when I do the blog editor, then when you click that blog button, all that’s automatically going to be done, your headlines will be in there, your paragraph breaks and so it just saves you some time and an effort as you’re working on your subtitles there, this is what I was referring to here when copying to a different layout.
When you’re editing your video, you have your make and save buttons but you also have a copy button 
and this is something that I think a lot of people miss out on because it’s probably the most powerful feature. One of the most powerful features on the platform is the ability to take your video and then copy it over to another layout and the system does the math and moves everything around where it should go. But before when you did that again, all versions of the same video shared the same subtitles, and that works great in one sense because you’re not having to go in every time and re-edit all your subtitles, but sometimes you do need there to be a difference between the two and so what I tell people is going do your major edit and then if you want to maybe you want to create a short version or you want to create a version. you’ve added line breaks in your subtitles so there to the line but you want them to be one line and another one.
Master Cloned Subtitles

When you click that copy button, you can choose to clone your subtitles and create a clone of them only for that one layout. That one version you’re working on. You have a unique set of subtitles. you can make whatever changes you want to them and it’s not going to affect all your other videos, all your other layouts, and everything. So that’s a really helpful feature that I’ve been using myself and I think it will be helpful for you as well.
Remove Backgrounds from Frame Grabs
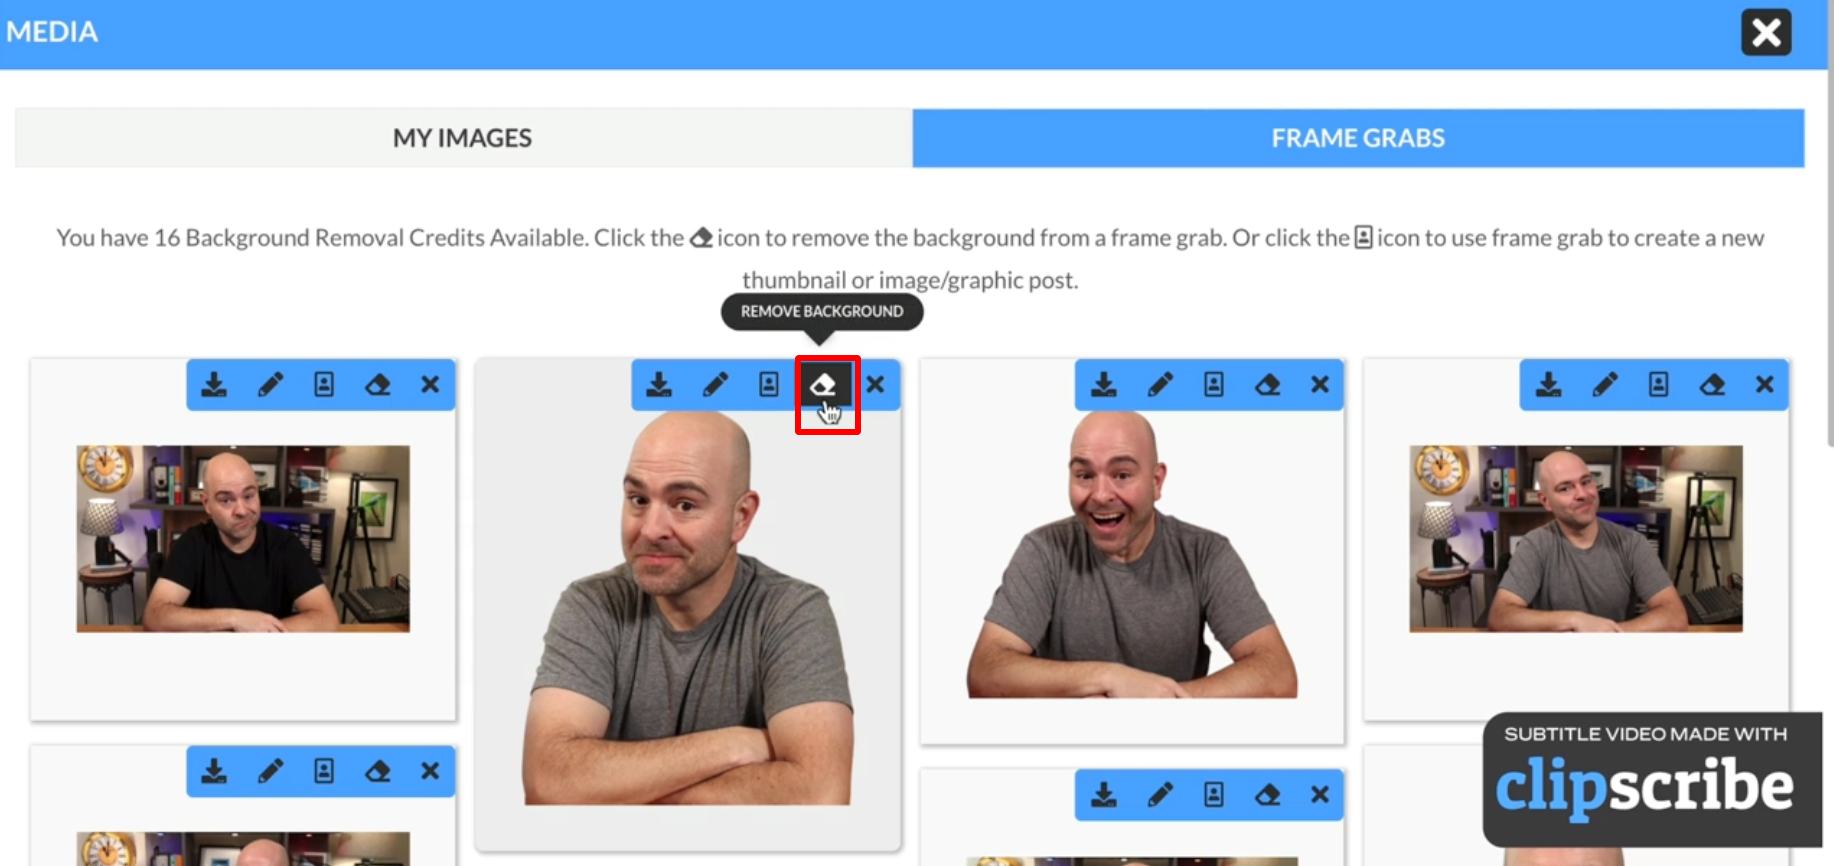
This is another, I feel a game-changing feature. So like I said, you can get frame grabs now but we’ve integrated with a site called removed.bg which automatically removes the backgrounds from photos. and so if you’re on the pro or the agency plan, you get a number of these remove.bg credits in your plan and with the click of an icon, you can remove the background from your frame grab, and then you can either download it or you can poured it over into our new image editor and create a thumbnail or create a still graphic with it. So this is really cool and like I said a feature that many of you don’t know about, you can get to this frame grab area by clicking on the logo image button and you’ll see a new tab there that says frame grabs. I’m going to put that in a better place but for now, that’s where it is. and any time you capture frame grab it sends you over there automatically. So and then from that same frame grab gallery, you’re going to see a little icon, a little person icon above it and when you mouse over it’s going to say create a still image. When you click on that it’s going to allow you to choose a layout and eventually choose a template. and you can save these still image templates and then create a still graphic from it.
So you can see this example right here. This could be a thumbnail, it could be a still image graphic that I could post wherever whatever social media I want. So the goal being to just utterly maximize your subtitles, your text in your video, take them and take your video and turn it into still images, turn it into thumbnails and do all kinds of stuff with it. I think that’s all of these. But I have one more dimension that I’m noticing that I didn’t put on here is a bizarre quote editor.
Still Image and Thumb Creation
We have a quote editor now and this ties also into the still image and thumb creation and as you’re editing your subtitles, you’ll see a little, when you select some text, a little quote icon pops up above it, and if you click that is going to add your selected text to a quote editor and basically to like a gallery of your own quotes, and then when you’re creating these still images that I was just talking about, you can actually import those quotes into that still image. 
So you can, we go through, we make these videos but we’re not thinking about all the things that we say and some of them are quotable stuff. there’s stuff that we could be using to create graphics for and so this is very, very much a beta version of this. but the goal is to start making it really easy for you to take your videos and turn them into still graphics. Again, maximizing the impact and the attention that you get from a single video beyond just posting, your video or posting multiple videos.
I’m really excited about that and recommend you play around with it and let me know with any of this stuff. I mean there are obviously all-new features, most of you probably don’t know anything about them. so start using them, start playing around with them and give me feedback, let me know what we can do to improve upon them because it’s your feedback that makes most of these features in the first place and most of the site is built on people saying to me, Hey, why can’t I do this? Can I do this? Can you add this? And a lot of times it’s just simple add, like a lot of times it’s like, yeah, I can do that, this afternoon or whatever. I mean many times it’s more complicated, but you never know. So just understand that and, that’s what we’re here for so hopefully this was helpful to you, and understanding these features coming soon, very soon.
I’m going to start being doing demos of each of these individually so you can see how they work, in the wild and get a better understanding of what these new features are and how they can help you really make an impact with your video content. So I appreciate y’all watching this is Craig again and I will see you on another video soon. Thanks!